Welcome back! Did you try out any thread combinations on your sewing machine? Did you at least dig out your free motion feet?
Best tip ever:
I’m going to give you a big tip before we get started today. You can read all the information you want, you can acquire as many books and magazines as you have shelves and you can take as many classes as you can fit in your schedule, but the only way to really understand free motion quilting is to sit at the sewing machine and practice!
I have to laugh because even I’m guilty of not doing that! I’m really good at buying books and magazines that have great ideas and techniques that I want to try. Let’s just say that if one learned by osmosis based on what you had in your studio – well I’d be the smartest quilter in the world!
Nope – the only way to get better is to practice.
Today we’re going to talk about thread tension, a few more adjustments you can make to the sewing machine and a bit about needles.
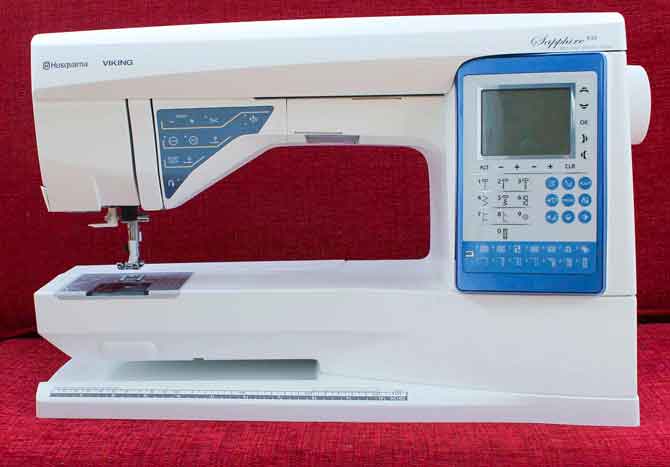
Again – I’m using the Husqvarna Viking Sapphire 930 for my practice. The sewing machine has so much flexibility that it allowed me to create samples of what you don’t want and then with a few adjustments, I had the machine working beautifully. It handled all my thread/needle combinations without so much as a skipped stitch or broken thread.
Number 1 – understanding thread tension
I’m not going to go into a big in depth discussion on thread tension, but I’ll give you enough information so that you should be able to fix most of your problems with thread tension. I’ll say it one more time – to get started, keep is simple. Use 50 weight thread – the same weight you would use to piece your quilt tops. There’s no need to complicate things by using invisible or heavy threads. Let’s get the techniques under our belt and then we can start to vary different things.
For these examples, I used 50 weight cotton thread in the top and bobbin. I used gray on top and I alternated between black and white on the bobbin. You’ll see why in a minute.
One of the nice things about the Husqvarna Viking Sapphire 930 is that it has the Exclusive Sewing Advisor. When you set your fabric type and sewing technique, the sewing machine will set an appropriate tension. The tension is also dictated by the selection of the appropriate free motion mode.
However if you’re not happy with the tension selected, you have the choice to over ride it. People are afraid of touching this setting. Here’s the good news – you can mess around with the tension setting and nothing bad is going to happen. You can’t break this feature. Simply move the numbers higher or lower – it’s that simple. If you select another stitch or turn off the sewing machine, the tension setting goes back to the default.
But you need to understand what those numbers mean and how they affect the thread tension of your quilting.
In the photo below, the tension has been set by the Sapphire 930 to 4.6. See how the entire bar is highlighted. That’s the default for the selections chosen in Exclusive Sewing Advisor.
Notice what happens when I start to manually adjust the tension. The number is no longer the same color as the bar. This alerts me that I have moved away from the tension suggested by the Sapphire 930. And that’s something very important to note – just because the Sapphire 930 recommends this tension setting – it doesn’t mean that I have to use that tension setting.
My combination of thread color, thread weight, type of fabric might affect the thread tension and I need to know how to adjust it so I’m getting a nicely formed stitch. You must become comfortable with changing this setting.
This highlight feature makes it pretty fool proof to get the tension back to the default setting for this stitch.
What do those numbers mean anyway???
There are two tension settings on the sewing machine – one for the top tension and one for the bobbin tension. Again – I don’t like to complicate things, so I try to only adjust the top tension and leave the bobbin tension alone. You know those ads on TV about the cars on closed circuit tracks? Professional drivers? Yes – adjusting the bobbin tension is like those drivers. You can adjust the bobbin tension, but for regular quilting – I do not.
You should be able to fix most tension issues by addressing the tension for the top thread only. You may have to adjust needle/thread combination, thread colors and many other things but do not touch that bobbin tension. OH – you want to know why? It’s a very delicate balancing act – a teeny tiny screw that adjusts the tension. There are no dials or markings. If you mess around, it’s hard to get the tension back to what you need for regular sewing. It can be done, but not unless you absolutely know what you’re doing.
Now about those numbers. On all sewing machines, those numbers range from 0.0 to 9.8. Older machines will have a dial that ranges from 0-9. Same thing – just different presentation.
When the tension is set to 0.0, there is absolutely no tension on the top thread. I’ll show you what that does in a minute. When you’re at 9.8, there is a LOT of tension on the top thread. The higher the tension number, the tighter the top thread.
Thread tension for normal sewing is in the range of 4.0 – 6.0 – again a lot of factors can affect which number is most appropriate for what you’re doing. Not only should you check the tension when you’re quilting, but be aware of it for regular sewing as well. Too loose and your work will fall apart, too tight and you’ll get puckering.
Let’s check out my experiments and see what happened.
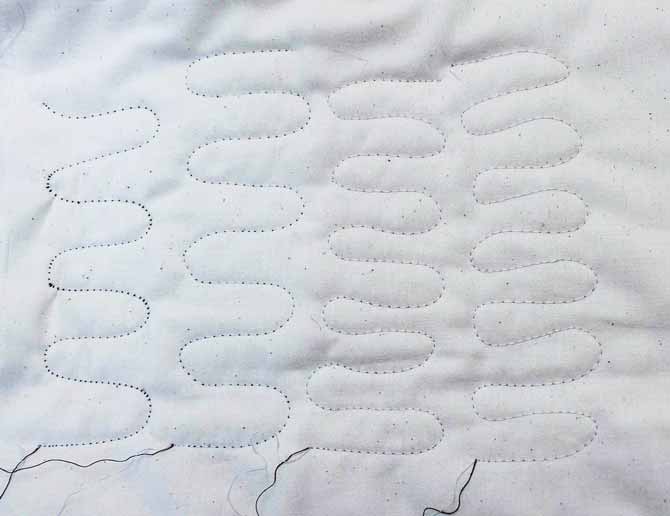
I thought you would be interested in this next sample. Remember the shadowing that I talked about yesterday? Well have a look at the bottom line of stitching in this sample. Yes – the tension looks terrible. I have black thread in the bobbin and gray on top. Now look at the top sample. Oh my – I must have done some adjustments of the tension. Right? Wrong! I simply changed the color of bobbin thread to white. Problem completely eliminated.
The example on the bottom is not wrong – the stitches are well constructed and will not pull out. But if I were going to use those very high contrast threads, then yes – I’ll adjust the top tension slightly – in this case, I’m going to lower the number to loosen the top thread. This will help the bobbin thread to pull the top thread deeper into the quilt sandwich. With this high contrast, it’ll be very hard to completely eliminate the shadowing by changing the top thread tension. If I loosen the top thread too much, I risk losing the nicely formed stitched. I can change the bobbin thread color or reconsider my choice of quilt backing.
Let’s play with the tension. Now I’m cranking up the tension to the highest level it’ll go. This means there is a LOT of tension on the top thread.
Have a look at the stitching. You can see how the top thread (the gray) pulled up that black bobbin thread and there’s puckering on the corners. This is not good.
If you want to test to see if these stitches are well constructed – clip the top thread about 3″ away from where you started. Pull the end of the thread – does it pull out? If so – then the stitch construction is not good.
What happens if we put the top tension at 0.0? Any guesses?
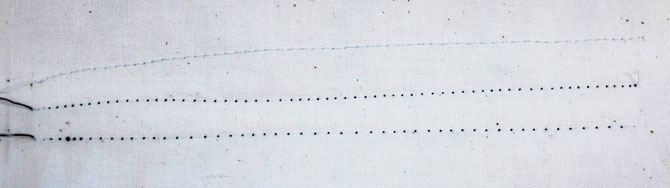
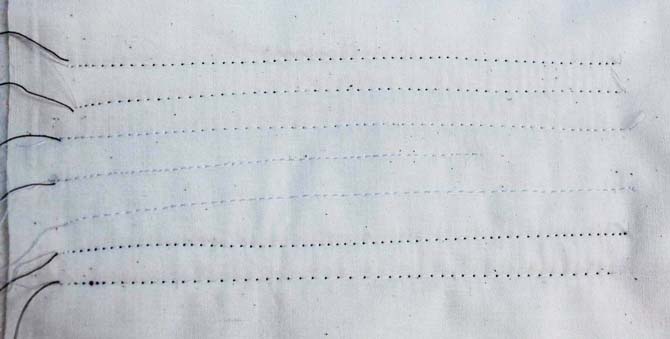
The stitch out below shows three straight lines of stitching. The bottom one was done with the tension at the highest setting. See how that tight tension didn’t really affect the stitching when done in a straight line. But it did affect the stitching when we did the curvy lines.
The middle line was done at the default tension of 4.6.
The top line was done at 0.0. We did get rid of the shadowing, but what does the back look like?
Hmmm – I think we have a problem.
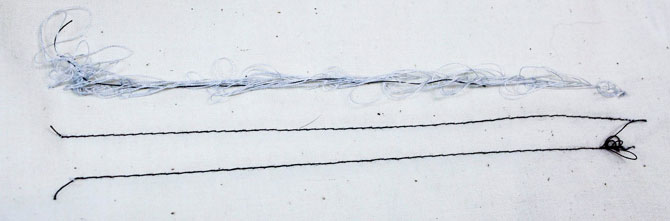
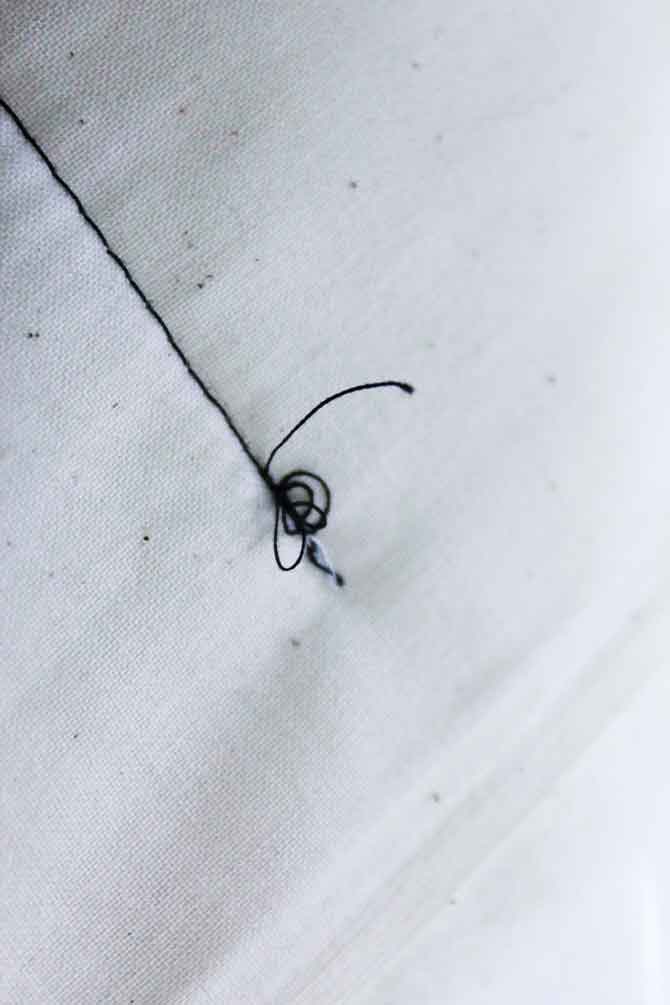
The bottom line was done at the highest thread tension setting and you can see that even though I brought the bobbin thread to the top of the work, I still got a thread nest. Doesn’t look nice if your threads will be visible on the backing.
The middle line was done at the default setting.
The top line – oh my – that’s a serious problem. There was no tension on the top thread. Definitely not a good thing!
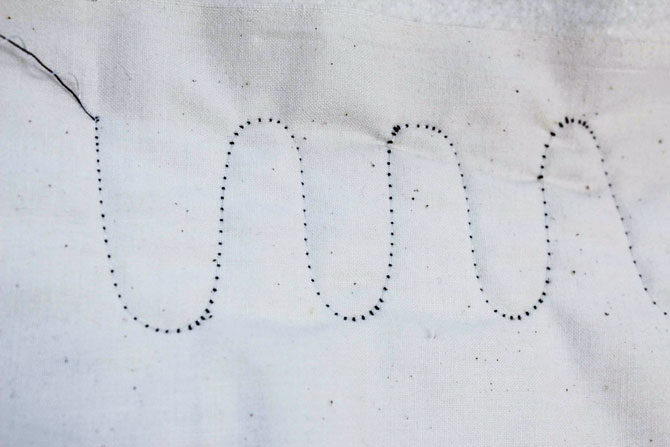
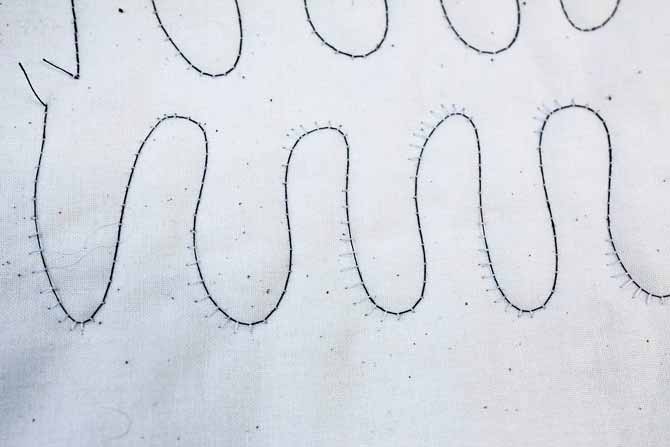
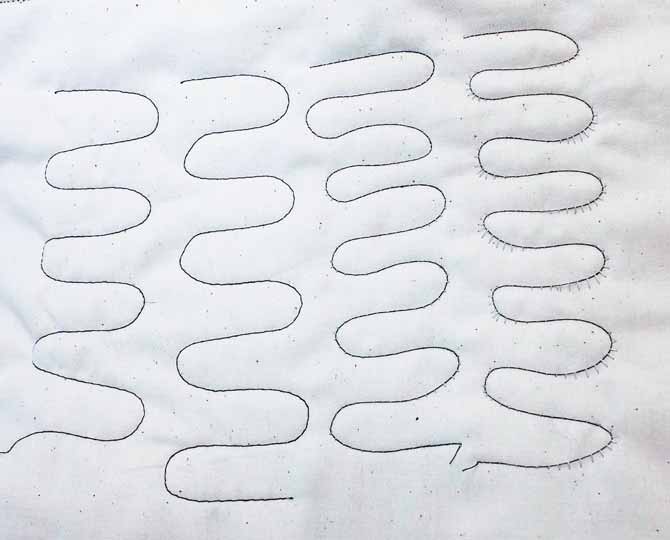
OK – now we know that we can’t stitch with zero tension on the top thread – at least not in this case. I upped the thread tension to about 2.0 and did some curvy lines. Did I get better results? Have a look.
You can see that I’m getting “eyelashes” on the wrong side of the work. The bobbin thread is pulling the ‘still too loose’ top thread to the back of the work.
How to solve the problem? Increase the number for the top thread tension. It’s currently at 2. Try 3. Remember the default was 4.6.
To recap – please please please do yourself a favor and do your experimenting with 50 weight thread. You know your sewing machine likes this thread because you piece with it all the time.
Don’t be afraid to experiment. Play with the top thread tension – start at the highest setting and move down to the lowest. Do a straight line of stitching and then do a curvy line of stitching at each setting. No need to do tons of examples – we’re just testing the tension at this point. We don’t care about your stitch length or how straight your lines are – this is not about YOU! This is about how the sewing machine is working. Your skill level will come later!
Try using different thread colors in the top and bobbin.
Don’t touch that bobbin thread tension.
Have fun – this is NOT about perfection – this is about learning. Learning is supposed to be messy and fun. Once you get things working the way you like – then and only then can you start to experiment with different threads.
As you make your samples, label them or make notes. This is an excellent exercise and will help you to retain the information.
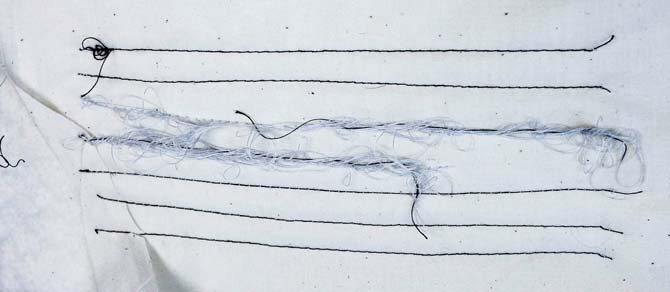
Here are my final stitch out samples – both the straight lines and the curvy lines.
Number 2 – bring up the bobbin thread to the top of your work
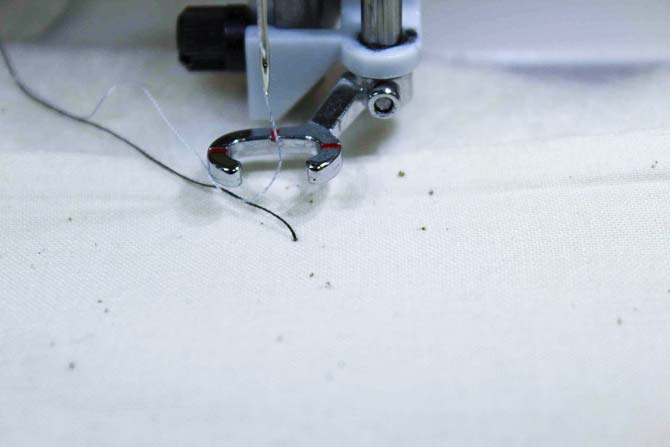
To prevent a mess on the wrong side of your work, you MUST bring up that bobbin thread to the top of your work. In this photo below, you can see that my black bobbin thread has been pulled through the quilt sandwich. The open toe foot allows me to easily tuck both threads to the back of my work and out of my way as I proceed to quilt.
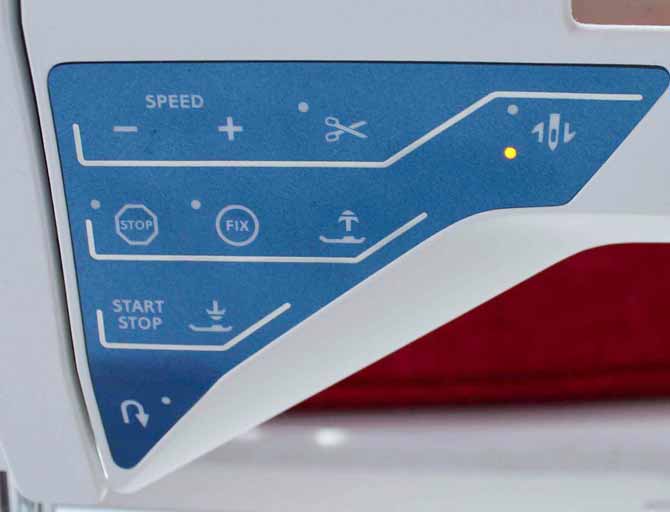
Number 3 – more machine settings to consider
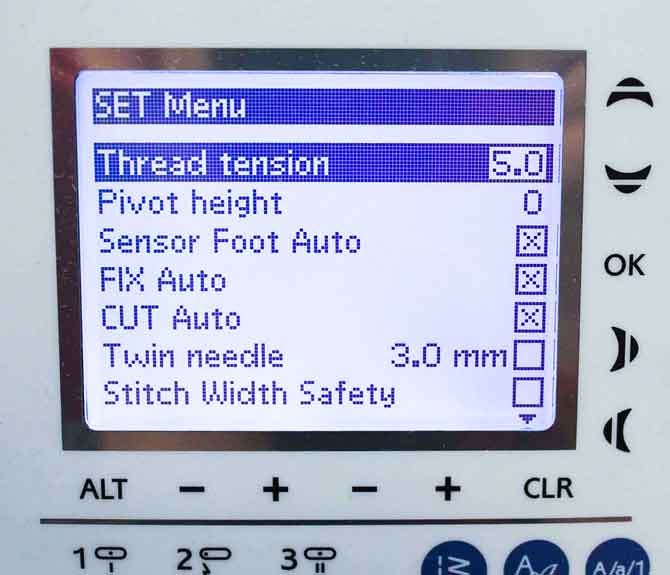
Depending on how you have your sewing machine set, you probably do not need to have the FIX button on. You can change that in the set menu. The FIX button locks the stitch at the beginning of your stitch sequence. When you’re doing free motion, you’ll learn to lock the stitches yourself without the aid of the sewing machine. It’s faster.
I do not use the scissors when free motion quilting. I like to control that bobbin thread on top (even though the scissors cuts it short. This allows me to control how the bobbin thread looks on the back. All starts and stops will be the same. Even when I put in a new bobbin, I don’t clip that bobbin thread off, I leave it long enough to bring to the top of my work. This is especially important if you want to bury your thread ends in your project.
Play with the speed control to find a speed that you’re comfortable with. Take note of that speed. By using the setting on the sewing machine – you’re eliminating one more variable.
All these features on the Sapphire 930 takes some of the guess work out of our quilting so we should become familiar with them and use them.
Number 4 – needles are important!
You’d be amazed at how many people don’t change their sewing machine needle until it breaks. GASP! You should change the sewing machine needle on a regular basis. How regular? About every eight hours. Who knew? Think about it – that needle is sharp when you start and after pounding through your quilt sandwich many many times, the point gets dull and now you’re trying to use a dull needle to slice between the threads of your fabric. A dull needle will cut through the threads and cause premature wear and tear.
How do you measure 8 hours of sewing? I wind four bobbins and when I’m done with those four – I clean the bobbin case (very important as a linty bobbin case can also affect tension) and wind four more bobbins. Oh yes – and I change the needle of course.
There are many kinds of needles on the market. But with a little knowledge you’ll be just fine. Just remember – many issues with free motion quilting (skipped stitches and especially breakage are caused by a bad needle/thread combination). That’s why we’re going to keep this discussion brief and simple!
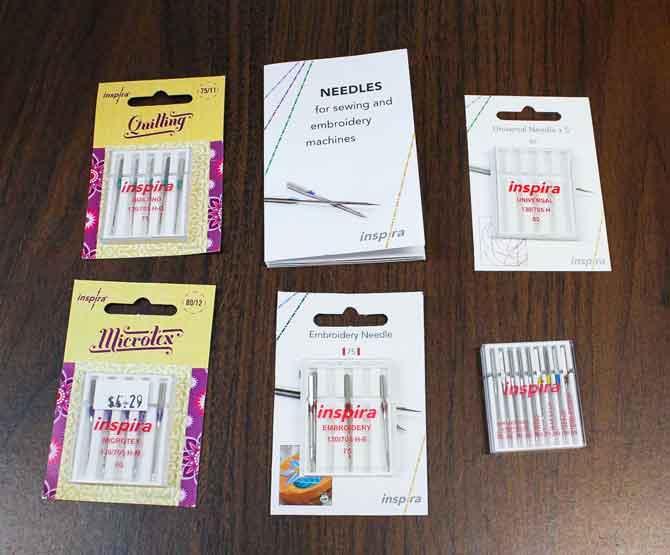
Buy good quality needles. There are many brands on the market. A new line of needles by Inspira have made vast improvements in the way the needles are manufactured which helps to prevent issues with thread breakage and needle breakage.
While there are many types of needles on the market, you only need a couple in your tool box.
I love to use Microtex needles – they’re sharp and strong and produce a very nice tight stitch. I try to use them for everything. If I’m going to use a thicker thread, then I use a topstich needle (sometimes) and if I’m using metallic thread, then I use a metallic needle (sometimes). Yes – that’s it – three types of needles and all are based on the TYPE of thread used. I guess I’m a bit of a lazy quilter. I try to do everything with ONE needle. BUT if I start to have problems – then I move to a needle that I know will solve the problem. i.e If I’m using metallic thread and my thread keeps shredding – then I use a metallic needle. That’s a bad thing to confess to new quilters, but I like to keep things simple. Why fix something if it isn’t broken?
You should also concern yourself with the size of needle. Too big and you end up with major shadowing issues. Too small and you end up with shredding and breakage. If I’m using small threads (remember threads with higher thread weight numbers – like 60+) then I like to use a smaller size needle – like a 60/8. Yes – needle sizes go in the opposite direction from the thread – the higher the number, the bigger the needle. Otherwise I use a size 80/12 for 95% of my quilting. Matter of fact, I use an 80/12 Microtex for 95% of my work.
Again – we need to keep this simple. There’s no need to complicate things by changing needles – use the 80/12 Microtex and move to another type/size if you are running into problems. For the samples you are going to make with your 50 weight thread – these 80/12 Microtex will work just fine. Again – we eliminated one more variable so you don’t have to worry about it.
The other thing is that if you ask 100 professional quilters what their opinions are about needles, you’ll get 100 different answers. Start with the basics and then experiment. Find out what combinations work for you.
Do you see a theme in the posts from the last couple of days? Yes – keep it simple. Everyone gets so caught up in how stressful free motion quilting is. That’s why we need to keep things simple. Regular 50 weight thread, same needle that you use to piece, a few setting changes on the sewing machine and you’re ready to go.
I can’t stress this enough – in order to really understand how your sewing machine works, you have to try some of those sample stitch outs that I showed in this post. It would take you about 1/2 hour to test those various tension settings. Once you can appreciate the basics, then you can try more experiments.
The other thing to keep in mind, is to let the features of the Husqvarna Viking Sapphire 930 do the work for you. Speed control, settings for free motion, etc. They’re there to simplify the process for you – take advantage of them.
Above all – remember this is your hobby and it’s supposed to be fun. Did you notice that we haven’t even got near actual stitching yet! Oh yes – there’s lots to think about – we don’t need to complicate things, but with an appreciation for how simple we can keep things – you’ll be a pro before you know it.
Tomorrow we’re going to look at a couple of ways of marking our designs and how to get some practice before we hit the sewing machine for the real deal. I hope you’ve found these 4 ways to solve thread tension issues useful! Have a great day! Ciao!
This is part 3 of 5 in this series.
Go back to part 2: 5 things you need to know about thread when free motion quilting
Go to part 4: 2 styles of free motion quilting
21 comments